CSS spec guides
Contents
First Steps with spec
Hands on spec tutorial
Short Introduction
This tutorial is the first in the series of spec guides. Through this tutorial you will be guided in your first steps with spec. At the end of this tutorial you should be familiar with the spec command line interface. You will understand the basic operation of motors and counters in spec. You will also be able to acquire data, visualize it and save it for later use.
But, first of all, we will start with the basics, what is spec? What can you expect to obtain with it?
If you have not yet obtained a license contact Certified Scientific Software, visit http://www.certif.com/content/support/ to obtain information on how to get one.
spec is a unix-based software package for experiment control and data acquisition. It is widely use for X-ray diffraction at synchrotrons, universities and laboratories around the world.
spec supports a large number of hardware devices commonly used in laboratories. The spec command line and programming interface allow you to access them without knowing about hardware specific details. spec provides an abstraction layer for them with easy to handle motor and counter objects, but also detectors or generic interfaces (like sockets, gpib or serial lines).
The spec user interface is command line based. Through the command line interface you will get immediate and easy access to hardware and experimental sequences. But the command line goes far beyond a simple set of commands: it is in fact a powerful programming language, with advanced capabilities. You can combine commands to create new ones that will be inmediately available at the command line, as new commands or more commonly called macros. Ultimately the macro functionality will allow you to prepare and run sophisticated experiment sequences and handle the data so produced.
The most common experiment sequence in spec consists on what we call a scan: A motor will be moved in a range of positions and data will be acquired from detectors at each of those positions. spec provides data structures and embedded functions for common data saving, analysis and display. At this tutorial we will see how to save acquired data to a file for later analysis, you will see that you can get inmediately a first display of the data with spec's plotting graphics embedded functionality.
For a complete list of spec features, visit http://www.certif.com/content/spec/
But let's way no more, let's run spec.
Running spec
Once spec is installed in your unix machine, you will start it from a terminal as any other unix command. Common names to start it can be spec, fourc or sixc (the last two correspond to the name of your specific diffractometer geometry). If none of them work check with your software person or the person who installed the package.:
user@myunixpc:~ fourc

                   Welcome to "spec" Release 5.10.01-9
         Copyright (c) 1987-2011 Certified Scientific Software
                          All rights reserved

(Portions derived from a program developed at Harvard University.)
(Linked with BSD libedit library for command line editing.)

Using "/Users/rey/spec.d" for auxiliary file directory (SPECD).

Getting configuration parameters from "SPECD/fourc/config".

Using four-circle configuration.

=
spec Hot Line:  (617) 576-1610.
Type h changes for info on latest changes.
Browse to http://www.certif.com for complete documentation.
=

Reading file "SPECD/standard.mac".
Warning:  No open data file.  Using "/dev/null".
Type "startup" to initialize data file, etc.

Reading file "SPECD/four.mac".
Warning:  Using default lattice constants.
(UB recalculated from orientation reflections and lattice.)

Reading file "SPECD/site.mac".

1.FOURC>
Upon startup spec will present the prompt waiting for you to type the first commands. Before the prompt you can see a number of informative messages. These message will be very interesting later on as general information but also for debugging in case of problems. We will not go through them at this stage.
Motors
Try now your first command. If your spec administrator has configured some motors for you you will get the following output on the screen when you type wa::
35.FOURC> wa

Current Positions  (user, dial)
Two Theta     Theta       Chi       Phi    Height    X Tilt
      tth        th       chi       phi       hgt       xti
  90.0000   45.0000    0.0000  -45.0000  120.3000    0.4900
  90.0000   21.6000    0.0000  -45.0000  120.3000    0.4900
The output of the wa shows the names and positions of all the motors configured in this spec application.
Remark that the names of commands in spec are normally short, a few letters long, in much the same way as the unix commands. Normally the commands will somehow refer to the function they are meant to accomplish. In this case wa stands for where all, to show all motor positions.
Remark also that two positions are reported for each motor: user and dial. The user position is the position that will be used more often. It is used for movement, scanning and most of the operations with a motor. For convenience you may want to set the user position to an arbitrary value, like for example setting the motor position to zero after you have align it. On the other hand the dial position shows the position as reported by the hardware. The conversion from user position to dial position is the simple formula: user = sign * dial + offset. Both sign and dial are configurable values.
A motor has a long name and a short name. The long name is more informative to tell the user about the role that the motor plays in the diffractometer or lab. The short name, that is more commonly referred as the motor mnemonic, is the one that you will always use to send commands to a particular motor. For example,:
36.FOURC> wm tth

           Two Theta
                 tth
User
 High       120.0000
 Current     60.0000
 Low       -120.0000
Dial
 High       120.0000
 Current     60.0000
 Low       -120.0000
The motor is here displayed with a bit more detail. Together with the user and dial positions, its software limits are displayed. Independently of the security that is normally installed at hardware level, spec can setup software limits to define the authorised range of movement for a motor. See the set_lm help page for details on how to do it.
And finally a motor is meant to move.
38.FOURC> mv tth 45

39.FOURC> wa

Current Positions  (user, dial)
Two Theta     Theta       Chi       Phi    Height    X Tilt
      tth        th       chi       phi       hgt       xti
  45.0000   45.0000    0.0000  -45.0000  120.3000    0.4900
  45.0000   21.6000    0.0000  -45.0000  120.3000    0.4900
That is it. The command mv moves a motor to an absolute position. Other commands exists to move by a relative distance, mvr or showing updated position while moving umv, and others still exist. To know how to use a certain command spec comes with documentation that can be consulted directly in spec or online at http://www.certif.com/spec_help/index.html. The command itself if you try to run without paremeters, can give you sometimes usage information.:
40.FOURC> mvr
Usage:  mvr motor relative_position
For many commands help pages are available with spec.:
41.FOURC> help mvr

NAME
          mvr and umvr - move a single motor relative to its current position

SYNOPSIS
          mvr motor relative_position
          umvr motor relative_position

DESCRIPTION
          The mvr macro moves motor to a position at relative_position from the current position.
          If the motor is initially at position X this macro will move the motor to X+
          relative_position.
[...]
As you can see commands are short and easy to remember. Remark, as stated before, that any motor can be moved, questioned, scanned in the same way, regardless of its underlying hardware details. This is one of spec's strengths. Motors and other pieces of hardware are standardized in a simple, but powerful, user interface. This is true regardless of the hardware details behind. Once a motor is configured, you do not need to deal anymore with any manufacturer specific details. The abstraction can go much further and you will see in other spec guides that you could make things, for convenience, to look as motors in spec. The spec programming and configuration capabilities includes features for it. For example, you could move a pressure or a temperature, or create motors whose position is derived from other motor positions or yet, that they can drive several other motors at the same time. For example, moving the height of a table by the combined movement of three motors combined into a single one.
This abstraction applies to motors, but you will see that similar abstraction applies also for counters and other pieces of hardware.
Diffractometers
The initial motivation for the spec package was the need for specialized software to drive diffraction experiments. Even if with time spec functionality goes far beyond the diffractometer operation, still diffractometers and the ability to work in crystal coordinates is one of spec most interesting features. For this, easy to use, specialized commands exists. For example, a way to look at the relevant diffractometer motors and other information:
41.FOURC> wh

H K L =  0.70711  0.29289  0
Alpha = 0  Beta = 0  Azimuth = 90
Omega = 0  Lambda = 1.54

Two Theta     Theta       Chi       Phi
  45.0000   45.0000    0.0000  -45.0000
wh does not show all the motors but only those related with the diffractometer operation. You see that information like the diffractometer H, K and L values are shown, but also Azimuth or the current energy are also listed.
The particularity is that spec allows you to think in crystal positions rather (H,``K``,``L``) than in motor positions.:
42.FOURC> br 1 0 0
br (like Bragg) is the equivalent of the mv command. It moves all the motors of the diffractometer to go to that peak. After the command execution you can check the position again:
43.FOURC> wh

H K L =  1  0  0
Alpha = 0  Beta = 0  Azimuth = 90
Omega = 0  Lambda = 1.54

Two Theta     Theta       Chi       Phi
  60.0000   30.0000    0.0000    0.0000
Or maybe, before you move, you want to know where your diffractometer would go if reaching a certain peak:
54.FOURC> ca 1 0 1

Calculated Positions:

H K L =  1  0  1
Alpha = 30  Beta = 30  Azimuth = 90
Omega = 0  Lambda = 1.54

Two Theta     Theta       Chi       Phi
  90.0000   45.0000  -45.0000    0.0000
ca's output is similar to the output of wh but it is only calculated positions. It shows where the diffractometer motors would go, but does not drive them.
The calculation is based on the particular diffractometer geometry that fits your installation. spec includes code for all the common diffractometer geometries and your application is setup specifically for your geometry.
spec provide many other commands to work with diffractometers, like for example, scanning in diffractomer coordinates, how to setup your crystal orientation or enter crystal parameters or provide energy information and more.
The spec user manual is a good document to continue learning about general diffractometer operation. The help pages for the specific geometry (like sixc or psic ) are also recommended readings if that is the geometry in your lab.
Counters
Together with moving motors, driving experiments is also about acquiring data. As with motors spec provides the user with a second general concept: counters and timers. As with motors, behind the counter commands the specific functioning of the electronics is hidden. In the most simple scheme an acquisition will be started on a timer for a given time while the configured counters will accumulated integrated counts.
Look at the following command::
338.FOURC> ct 1.5

Tue Feb 28 17:36:35 2012

     Seconds = 1.5
     Monitor = 640 (426.667/s)
    Detector = 0.44425 (0.295379/s)
       Roi 1 = 14.6215 (9.72174/s)
       Roi 2 = 0.839333 (0.558067/s)
This command consists in starting counting for 1.5 seconds and reading the acquired data at the end of the acquisition. If you then type ct again without the time argument spec will remember it and again for the same amount of time. If you want to interrupt the acquisition before the time is elapsed you can hit ^C on the keyboard. Then the acquisition will be stopped and the counts acquired up to that point will be shown.:
340.FOURC> ct
^C
Counting aborted.

Tue Feb 28 17:41:21 2012

     Seconds = 0.573
     Monitor = 247 (431.065/s)
    Detector = 0.440375 (0.768543/s)
       Roi 1 = 1.6855 (2.94154/s)
       Roi 2 = 1.59444 (2.78263/s)
It is also possible to count for monitor counts if the electronics provide that possibility. For that you must give a negative argument to the ct command. For example ct -500 will acquire until the monitor counter reaches 500 counts.
345.FOURC> ct -500

Tue Feb 28 17:46:04 2012

     Seconds = 1.07153
     Monitor = 500 (466.667/s)
    Detector = 0.673063 (6.2903/s)
       Roi 1 = 8.8475 (82.6869/s)
       Roi 2 = 0.832889 (7.78401/s)
Scanning
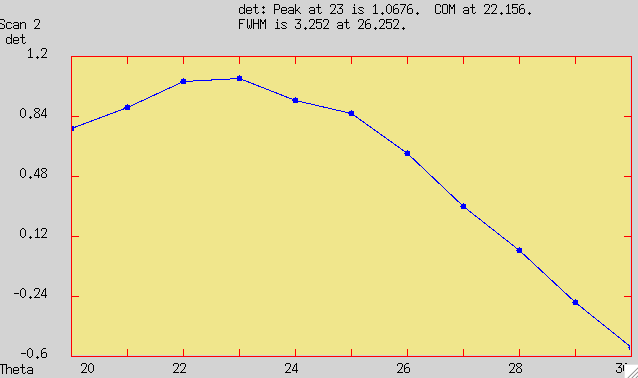
A complete acquisition sequence combines a series of motor movements with counting at each motor position. This is what we call a scan. As the scan progresses data will be produced and a data set will be generated. During a scan spec provides the user with a visualization tool to have a first view of the acquisition. This visualization tool will show a graph of the selected counter(s) and some basic statistics and analysis. At the same time data will be saved in a file for later inspection and further analysis.
Let's see how it looks.:
380.FOURC> ascan th 20 30 10 0.1
Total 11 points, 1.1 seconds

Scan   2   Tue Feb 28 18:19:37 2012   file = ~/data/fourc.dat  fourc  user = rey
ascan  th 20 30  10 0.1

  #     Theta Detector  Monitor    Seconds    Roi 1    Roi 2
  0   20.0000 0.767707        0      0.109    3.884    5.612
  1   21.0000 0.891102        0      0.106    4.589    4.131
  2   22.0000  1.04554        0      0.106    16.12     1.05
  3   23.0000  1.06755        0      0.107    12.67    6.301
  4   24.0000 0.934066        0      0.106    7.114    1.824
  5   25.0000 0.854553        0      0.108    10.77    7.137
  6   26.0000 0.613951        0      0.108    12.57    2.068
  7   27.0000 0.295807        0      0.108     1.56    1.535
  8   28.0000 0.0332695        0      0.109    14.22    5.258
  9   29.0000 -0.278594        0      0.109    9.078    6.982
 10   30.0000 -0.546065        0      0.108    8.764   0.5289
As you can see all the data, as far as it fits, is shown on the terminal window. In the header remark that each scan is assigned a number that will be incremented automatically when you run new scans. Until the user decides the same data file will be used. Scan data will be simply appended to the selected file. The scan number should be noted by the user to later find the scan in that file.
At the same time that the scan is started you should see a window opening and showing data as the scan progresses.
If you acquired data without a file selected your data will be lost. Don´t forget to select where your data will be kept::
381.FOURC> newfile

Data file (~/data/fourc.dat)? ~/data/test_experiment.dat
Last scan number (0)?
Using "~/data/test_experiment.dat".  Next scan is number 1.
Remark that at the time a new file is selected the scan numbering is reset to 1 unless you decide otherwise.
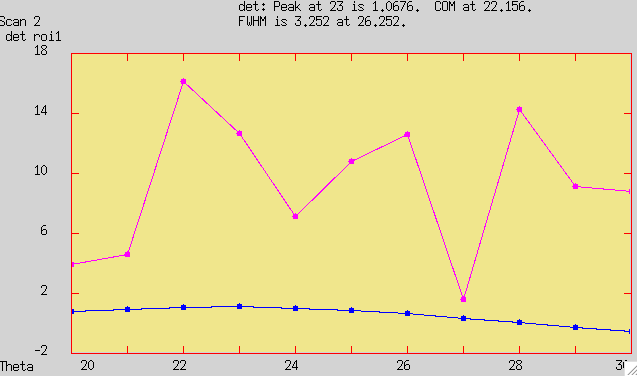
During a scan all the counters configured are acquired and the data for all of them is saved. Typically you will be interested in following specially what is happening with one of the counters. Also you may want to decide which counters to show in the graphics window. The macro counters will help you on doing all that.
382.FOURC> counters

Current counter configuration:

Num  Mnemonic  Plot
  0       sec    NO
  1       mon    NO  (is MON)
  2       det   YES  (is DET)
  3      roi1    NO
  4      roi2    NO

Counters to plot (det)? det roi1
Counter for DET (det)?
Counter for MON, -1 disables (mon)?
The counter selected as DET will deserve special treatment. For visibility it will be shown in the terminal window right after the motor position. Also, in the data file, it will be saved in the last column. This will facilitate later data extraction as the most interesting counter, even if is is a different one on different scans, will always be at the last position. In this way extraction tools will not need to ask the user again which detector data is to be processed.
The MON counter also deserves special treatment. On the screen it will shown second after motor and DET. In the file will be the second before the last column for the same reason. The MON counter is meant to be used later for normalization purposes, for example. This MON counter is not to be confused with the counting to monitor that is a hardware feature. Remember the explanation about the ct macro. Of course, very often the same counter will server for both purposes.
Finally, remark that more than one counter can be shown in the graphics window at the same time. Furthermore, spec keeps the data for the latest scan in memory. So if after the scan is finished you would like to visualize a different counter just run the counters macro and the replot with splot.:
385.FOURC> splot
Finish your session
And here ends this tutorial. Now, if you wish, to end your session just close spec by typing quit or hitting Ctrl+D at your keyboard.:
37.FOURC> quit

Jon's state is stored for /dev/ttys000.
Remark the last message. Your session information is saved and it will be restored at exactly the same point where you left when you will come back.
See also
Many sources of information exists, whether online or directly in spec. You already learnt about the help provided with spec.
- Reference documents
2. Other spec guides coming soon
- Diffraction in spec
- Programming spec
- Hardware in spec
- Data in spec
- And more
check on http://www.certif.com/ for howto guides and many more